I have had a lot of success with the snom UC Edition software for snom phones. Currently the snom 300, snom 370, snom 710, snom 720, snom 760 and snom 821 are officially qualified for Lync 2013. The snom UC600 is a traditional IP desk phone especially designed for use with Microsoft Lync.
It is still possible to install the UC edition software on phones that are not officially qualified, the most recent for me being a snom PA1. Obviously there are no guarantees that all functionality will work, but so far I haven't had any issues. The snom PA1 is a PA switch which picks up incoming calls automatically and outputs the audio to the built in 4 Watt amplifier, or to a line out connector if you want to connect it to a building PA system. In my case I have configured it as a Lync endpoint and connected to the speaker system throughout the building. Calling the configured Lync user enables staff make announcements.
The following guide has been generalised to assist with configuring any snom UC device.
Once you have plugged in and powered up the device, browse to the web management portal. The default address is 192.168.0.2/16, otherwise if you have DHCP the device will get an address this way. On the PA1 you can get its IP address by pushing the IP/Reset button and it will read it out. If you have a phone you can use the menu system to find it under "Information" - "IPAdr"
e.g. https://192.168.0.2
![]()
![]()
![]()
![]()
If you haven’t already you will need to register and install the Snom UC edition software.
![]()
![]()
Click on any identity from the left navigation panel of the snom web interface:
![]()
![]()
![]()
![]()
![]()
Check that the user account has logged in successfully:
![]()
If you have any issues check out the SIP Trace and Log, unlike a lot of products these logs are very useful in finding the problem.
It is still possible to install the UC edition software on phones that are not officially qualified, the most recent for me being a snom PA1. Obviously there are no guarantees that all functionality will work, but so far I haven't had any issues. The snom PA1 is a PA switch which picks up incoming calls automatically and outputs the audio to the built in 4 Watt amplifier, or to a line out connector if you want to connect it to a building PA system. In my case I have configured it as a Lync endpoint and connected to the speaker system throughout the building. Calling the configured Lync user enables staff make announcements.
The following guide has been generalised to assist with configuring any snom UC device.
Once you have plugged in and powered up the device, browse to the web management portal. The default address is 192.168.0.2/16, otherwise if you have DHCP the device will get an address this way. On the PA1 you can get its IP address by pushing the IP/Reset button and it will read it out. If you have a phone you can use the menu system to find it under "Information" - "IPAdr"
e.g. https://192.168.0.2

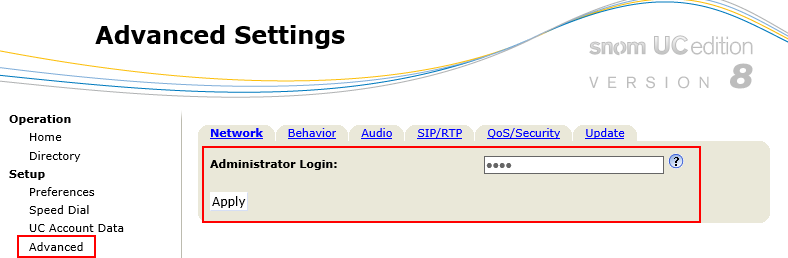
Snom has a user mode and admin mode. When logged in in user mode you won’t see any of the advanced options. To access the advance options select “Setup”-“Advanced”, enter the default admin password “0000” then “Apply”:
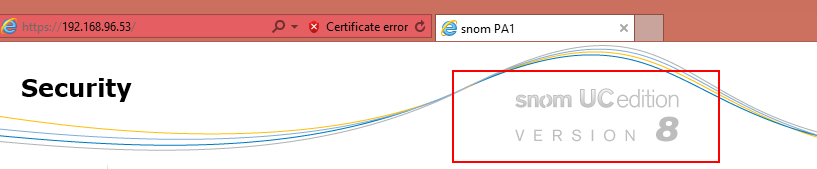
There is no username and password out of the box. To set the admin password and the HTTP web interface password navigate to “Setup”-“Advanced”-“QoS/Security”:

Select “Apply” then log back on using the HTTP server credentials you just set:

If you haven’t already you will need to register and install the Snom UC edition software.
Register here - http://www.snom.com/?id=280
Install the software from “Setup”-“Software Update”. Specify the full http:// address to the file on Snom’s downloads page. To get this link right click the download and select “Copy Link Address” or similar depending on your browser:

Account Setup
Click on any identity from the left navigation panel of the snom web interface:

Important settings
Identity active:ON
Display Name: Name to display on phone where applicable
Account: SIP sign-in address e.g. peter.pan@neverland.co.nz
Password: your lync password
Registrar: SIP domain e.g. neverland.co.nz
Display Name: Name to display on phone where applicable
Account: SIP sign-in address e.g. peter.pan@neverland.co.nz
Password: your lync password
Registrar: SIP domain e.g. neverland.co.nz
Optional
Outbound Proxy: SIP server e.g. front end pool or access edge (lyncpool.domain.com/sip.domain.com)
Note: It is also possible to specify the port and transport layer:
sip.domain.com:5060;transport=tcp (Use TCP/Port 5060)
sip.domain.com:5061;transport=tls (Use TLS/Port 5061)
sip.domain.com:5060;transport=tcp (Use TCP/Port 5060)
sip.domain.com:5061;transport=tls (Use TLS/Port 5061)
Note: Leaving out the Outbound Proxy will result in automatic DNS lookup for Lync (Auto Device Sign-in)
Authentication Name:Username e.g. peter.pan@neverland.co.nzor NEVERLAND\Peter.Pan
Note: If no Authentication Name is provided, the Account setting is used in place of the Authentication Name
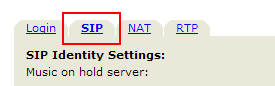
Ensure that “Server Type Support” is set to OCS/UC:

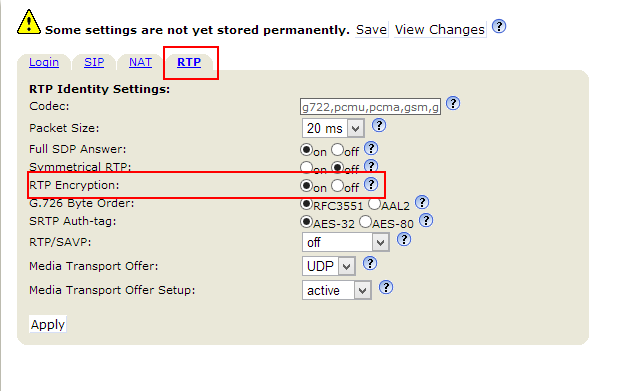
RTP Encryption should be set on “ON”:
Check that the user account has logged in successfully:

If you have any issues check out the SIP Trace and Log, unlike a lot of products these logs are very useful in finding the problem.